Before starting the base machine which the hydraulic breaker is mounted, check to use the machine safely and to prevent any trouble. Operation includes the following:
Cylinder Adjuster
The hydraulic breaker is designed so that the bpm (blows per minute) can be adjusted with the operating pressure and oil consumption kept constant by changing the piston stroke, enabling the hydraulic breaker to be used widely.
However, when the bpm is increased, the impact force will decrease. Therefore the bpm must be adjusted in accordance with job conditions.
The cylinder adjuster is installed to the right side of the cylinder. When the cylinder adjuster is tightened fully, the piston stroke become maximum and the impact blows (bpm) becomes the minimum.
The other way, when the adjuster is loosened about two turns, the piston stroke becomes the minimum and the impact blows (bpm) becomes the maximum.
#kt-layout-id_aede2a-b0 > .kt-row-column-wrap{align-content:start;}:where(#kt-layout-id_aede2a-b0 > .kt-row-column-wrap) > .wp-block-kadence-column{justify-content:start;}#kt-layout-id_aede2a-b0 > .kt-row-column-wrap{column-gap:var(–global-kb-gap-md, 2rem);row-gap:var(–global-kb-gap-md, 2rem);padding-top:var( –global-kb-row-default-top, 25px );padding-bottom:var( –global-kb-row-default-bottom, 25px );padding-left:20px;padding-right:20px;grid-template-columns:minmax(0, 1fr);}#kt-layout-id_aede2a-b0{border-top-left-radius:8px;border-top-right-radius:8px;border-bottom-right-radius:8px;border-bottom-left-radius:8px;overflow:hidden;isolation:isolate;border-color:var(–global-palette3, #1A202C);border-top-width:1.5px;border-right-width:1.5px;border-bottom-width:1.5px;border-left-width:1.5px;}#kt-layout-id_aede2a-b0 > .kt-row-layout-overlay{opacity:0.46;}#kt-layout-id_aede2a-b0 ,#kt-layout-id_aede2a-b0 h1,#kt-layout-id_aede2a-b0 h2,#kt-layout-id_aede2a-b0 h3,#kt-layout-id_aede2a-b0 h4,#kt-layout-id_aede2a-b0 h5,#kt-layout-id_aede2a-b0 h6{color:var(–global-palette3, #1A202C);}#kt-layout-id_aede2a-b0 a{color:var(–global-palette3, #1A202C);}#kt-layout-id_aede2a-b0 a:hover{color:#d8781f;}@media all and (max-width: 1024px){#kt-layout-id_aede2a-b0 > .kt-row-column-wrap{grid-template-columns:minmax(0, 1fr);}}@media all and (max-width: 767px){#kt-layout-id_aede2a-b0 > .kt-row-column-wrap{grid-template-columns:minmax(0, 1fr);}}
Read More: Excavator Attachments Select Guide
- Hydraulic Breaker/Hammer Select Guide
- Hydraulic Hammer Breaker and Chisel Tools Guide
- Hydraulic Grapple Select Guide
- Earth Auger Select Guide
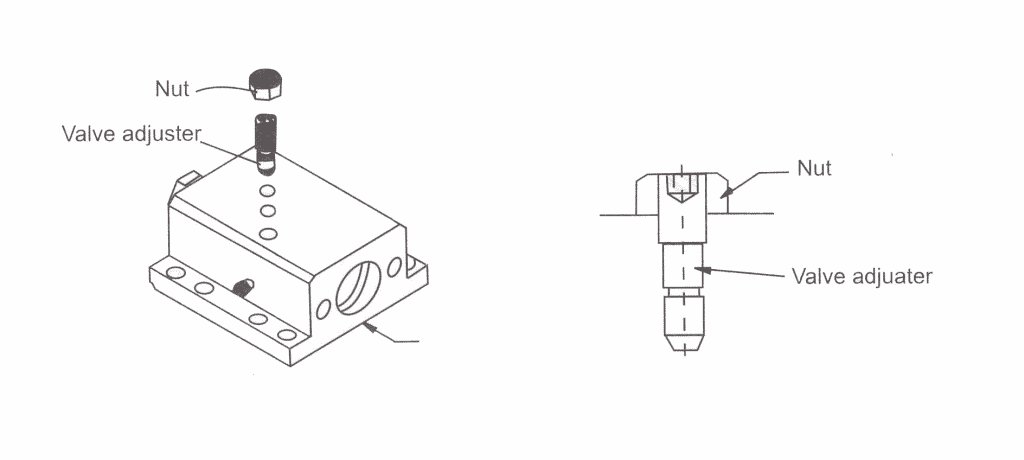
Valve Adjuster
The valve adjuster is installed on the valve housing. The impact blows and the oil consumption increase when the adjuster is opened and when it is closed, the impact blows and the oil consumption decrease.
When the oil flow from the base machine is lower or when the hydraulic breaker has been installed on large base machine, the valve adjuster can control the amount of oil flow artificially.
| Adjusting items | Procedure | Oil flow rate | Operating pressure | Bpm | Impact power | At delivery |
| Cylinderadjuster | Open Closed |
No change No change |
No change No change |
Increase Decrease |
Decrease Increase |
Full closed |
| Valve adjuster | Open Closed |
Increase decrease | Decrease Increase |
Increase Decrease |
Decrease Increase |
2-1/2Turn out |
| Chargingpressure in back head | Increase decrease | Decrease Increase |
Increase Decrease |
Decrease Increase |
Increase Decrease |
Specified |
Installation of Hydraulic Breaker
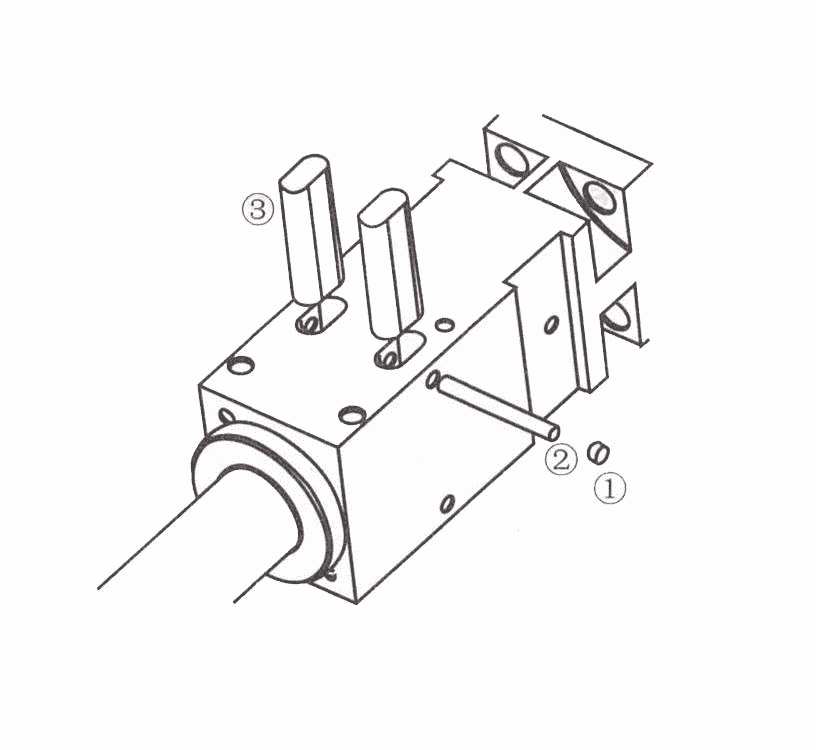
- Set the hydraulic breaker horizontally on wood blocks so that the accumulator may be upper side.
- Remove the rubber plug or spring pin ① and the stop pin ② into front head from opposite sides by using a hammer and a press pin. (Press pin is stored in toolbox)
- Lift up the tool pins ③ after inserting the press pin into the hole of tool pin from bottom side, and remove the tool pins from the front head.
- Insert the tool into the front head.
- Insert the tool pins, and then assemble the stop pin and rubber plug or spring pin in the front head.
- Using a hammer and a press pin, fasten the rubber plug or spring pin into the front head.
Notice:
Precautions for Inspection & maintenance
- Inspection: Check the base machine and the hydraulic breaker to use safely and to prevent any trouble before operation.
- Warming up the machine: Especially in winter or cold area, warm up the base machine first before the breaker operation.
- Safety Maintenance: Before starting the work, examine the geological and geographical features of work site and be careful of the ground crack or building collapse.
Cautions, when driving or stopping base machine
- Driving: Carry out driving while the hydraulic breaker is kept horizontally with ground and is 40 to 50cm above ground.
- Cautions on slope driving: When driving down on the slope, decrease the engine rpm and keep the angles with boom and arm 90o to 110 o.
- Stopping: When the machine is stopped, the hydraulic breaker stand vertically and set the tool end on the ground.
Precautions for Safety Operation
JIANGTU Attachments, as a breaker manufacturer for 12 years. We could provide various types of hydraulic hammer breakers and the chisel selection recommendation and installation instructions for you. If you have any questions, please feel free to contact us.
JIANGTU Excavator Break adopts special carbon steel material and heat treatment processes to ensure that the wear of the piston hitting surface is minimized and the service life of the piston is maximized.
Piston production adopts precise tolerance control to ensure that the piston and cylinder can be replaced with a single product, reducing maintenance costs.
The shell of the breaker has put forward higher and higher requirements for its sealing system. The NOK brand oil seals ensure our hydraulic breaker has low (zero) leakage, low friction and wear, and long service life.
.kadence-column_6bb113-5b > .kt-inside-inner-col{border-top-width:0px;border-right-width:0px;border-bottom-width:0px;border-left-width:0px;}.kadence-column_6bb113-5b > .kt-inside-inner-col,.kadence-column_6bb113-5b > .kt-inside-inner-col:before{border-top-left-radius:0px;border-top-right-radius:0px;border-bottom-right-radius:0px;border-bottom-left-radius:0px;}.kadence-column_6bb113-5b > .kt-inside-inner-col{column-gap:var(–global-kb-gap-sm, 1rem);}.kadence-column_6bb113-5b > .kt-inside-inner-col{flex-direction:column;}.kadence-column_6bb113-5b > .kt-inside-inner-col > .aligncenter{width:100%;}.kadence-column_6bb113-5b > .kt-inside-inner-col:before{opacity:0.3;}.kadence-column_6bb113-5b{position:relative;}@media all and (max-width: 1024px){.kadence-column_6bb113-5b > .kt-inside-inner-col{flex-direction:column;}}@media all and (max-width: 767px){.kadence-column_6bb113-5b > .kt-inside-inner-col{flex-direction:column;}}
Contact For Our Expert
Find out which attachment & Excavator works best for you!
.kadence-form-_b71a8f-dd .kb-form .kadence-blocks-form-field .kb-text-style-field, .kadence-form-_b71a8f-dd .kb-form .kadence-blocks-form-field .kb-select-style-field{color:var(–global-palette9, #ffffff);background:var(–global-palette3, #1A202C);}.kadence-form-_b71a8f-dd .kb-form .kadence-blocks-form-field .kb-text-style-field:focus, .kadence-form-_b71a8f-dd .kb-form .kadence-blocks-form-field .kb-select-style-field:focus{color:var(–global-palette9, #ffffff);}.kadence-form-_b71a8f-dd .kb-form .kadence-blocks-form-field .kb-forms-submit{color:var(–global-palette3, #1A202C);background:rgba(50, 150, 255, 0.92);border-color:var(–global-palette3, #1A202C);box-shadow:2px 2px 3px 0px rgba(0, 0, 0, 0.2);}.kadence-form-_b71a8f-dd .kb-form .kadence-blocks-form-field .kb-forms-submit:hover, .kadence-form-_b71a8f-dd .kb-form .kadence-blocks-form-field .kb-forms-submit:focus {color:#156fce;border-color:#1575d5;box-shadow:2px 2px 3px 0px rgba(0, 0, 0, 0.4);background:var(–global-palette3, #1A202C);}
.kadence-form-_b71a8f-dd .kadence-blocks-form-field.kb-submit-field { display: none; }
Related Articles

How to Install and Remove Hydraulic Breaker for Mini Excavator

Hydraulic Breakers Trouble Shooting and Solution

How to Maintain Hydraulic Breaker for Mini Excavator

How to Select Breaker Chisel Tools for Hydraulic Hammer

Why Hydraulic Breaker Need Nitrogen and How to Charge

Select Guide For Hydraulic Breaker Hammers – According to Productivity Rate

Tips to Maximize Hydraulic Breaker Life

How To Select Hydraulic Breaker/Hammer For Your Program?


